How to send 'Forgot Password' mail using Node.js and Gmail API - EHB
There are many ways to achieve this task, but here we will be using Gmail API and Node.js. Because almost everyone has a Gmail account, it will be easy for everyone to implement it.
Here we will be using OAuth2 and nodemailer npm package. To create a program that sends mail to users, you have to go through the following steps:
Step 1:-Create a folder named email-notification, and in this, create the "app.js" file.
Step 2:- Initialize npm using the "npm init -y" command.
Step 3:- Install the "nodemailer" and "googleapis" npm packages.
Use the "npm i nodemailer googleapis" command in the terminal.
Step 4:- Go to "https://console.cloud.google.com/"
If you have a google account, you will automatically log in when you visit this website.
Step 5:- Create a new project.

Click on where "My First Project" is written and then "new project" you can also search for "create a project" in the search box of the google cloud platform. Now enter any project name that you like. Let the location field to its default value and click on the "Create" button.
Select the new project you just created. You can do it by clicking where "My First Project" is written. It will show you your project list. Select your new project by clicking on its name.
Note:- For this post, we will be creating a project with the name "email notification"
Step 6:- Go to "APIs & Services > OAuth consent screen"
Open the sidebar of the google cloud platform and look for APIs & Services. After finding it, click on it and choose the OAuth consent screen. Select "External" for user type and click on the "Create" button. Now we have to add some details about our application.
We are creating this web application for testing purposes, so we don't need to fill all the fields.
In the "OAuth consent screen" step, we will fill the fields given below:
App information
App name:- Enter any app name that you want. I will use "email notification" as the app name.
User support email:- When you click on this field, Google will suggest an email address, but you can write any email. I will use the google suggested email. The email with which I logged into the google cloud platform.
Note:- If you add an app logo, you have to send your application to google for verification, and it will take a couple of days, so I advise you not to add your app logo yet.
Developer contact information
Email addresses:- You can add the same email you entered in the user support email. You can add more than one email here.
Now click on the "Save and Continue" button.
In the "Scopes" step, leave everything at its default value and click on the "Save and Continue" button.
In the "Test users" step, click on the "Add Users" and add the same email id you used before. After that, click on the "Save and Continue" button.
In the "Summary" step, scroll down to the bottom and click on the "Back to Dashboard" button.
Step 7:- Go to "Credentials" and create OAuth 2.0 Client ID

After clicking on Credentials, go to Create Credentials > OAuth client ID and for application type, select the "Web application" option. Everything will remain at its default value only thing we will provide is the redirect URI.
Click on "Add URI" and enter "https://developers.google.com/oauthplayground" in it. Then click on the "Create" button.

Note:- Make sure you don't enter "/" at the end of the redirect URI because it will result in an error.
It will create Client ID and Client Secret. Copy them. You can also see them by clicking on the "Web client 1" you just added.

Step 8:- Go to "https://developers.google.com/oauthplayground"
Now that we have Client ID and Client Secret go to the above website. Here we have to authorize API. In the input field, enter https://mail.google.com, But you can't click on "Authorize APIs" yet. First, click on the setting button on the right-hand side. Here check the "Use your OAuth credentials" option.
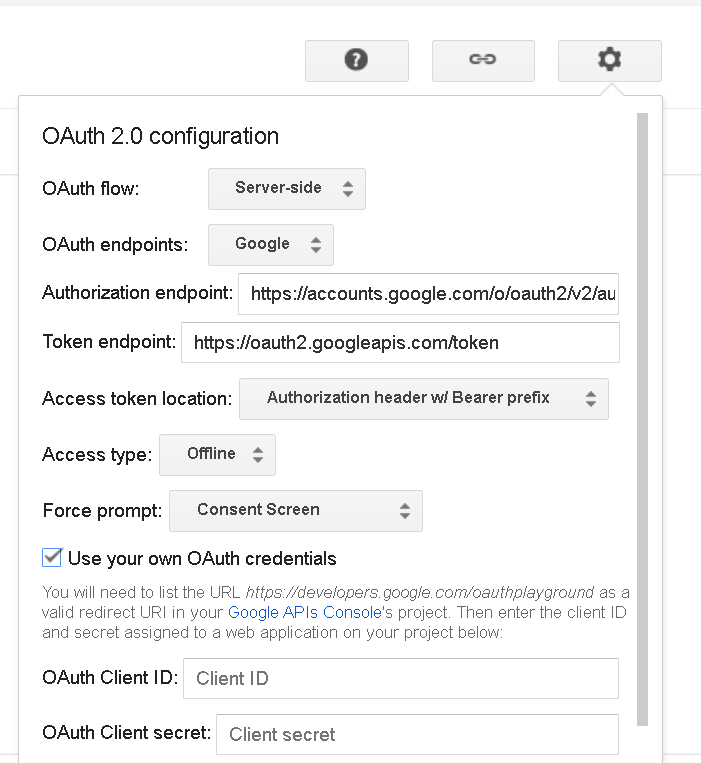
Now enter Client ID in the "OAuth Client ID" field and Client Secret in the "OAuth Client secret" field. Now click on close.
Now click on the "Authorize APIs" button. It will ask you to choose an account. Select the same Account you entered in the "Test users" step.
You will see the warning below because we didn't submit our application to google for verification, but you don't need to worry. Click on continue.

It will again ask your permission to access your Google account. Click on continue.
Now that we have the Authorization code, we can exchange it for the Refresh and Access tokens. Just click on the "Exchange authorization code for tokens" button.

It will take you to Step 3, but you can open Step 2 again, where you will see the Refresh and Access tokens. Check the "Auto-refresh the token before it expires" option.
Step 9:- Open "app.js" and write the below code in it
Now that we have all the things we need, we can start the coding part.
const nodemailer = require("nodemailer");
const {google} = require("googleapis");

const CLIENT_ID = "Enter your Client ID";
const CLIENT_SECRET = "Enter your Client Secret";
const REDIRECT_URI = "https://developers.google.com/oauthplayground";
const REFRESH_TOKEN = "Enter your Refresh Token";

const oAuth2Client = new google.auth.OAuth2(CLIENT_ID,CLIENT_SECRET,REDIRECT_URI);
oAuth2Client.setCredentials({refresh_token:REFRESH_TOKEN});

async function sendMail(){
    try {
        const accessToken = await oAuth2Client.getAccessToken();

        const transport = nodemailer.createTransport({
            service: "gmail",
            auth: {
                type: "OAuth2",
                user: "Enter your Gmail ID",
                clientId: CLIENT_ID,
                clientSecret: CLIENT_SECRET,
                refreshToken: REFRESH_TOKEN,
                accessToken: accessToken

            }
        });

        const mailOptions = {
            from: "notification <projectid00121@gmail.com>",   // Its format is  from: "any-text <Your Gmail ID>"
            to: "Reciever mail ID",
            subject: "Testing",
            text: "Testing gmail api",
            html: "<h1>This is html h1 tag</h1>"
        };

        const result = await transport.sendMail(mailOptions);
        return result;
    } catch (error) {
        return error;
    }
}

sendMail().then(result=> console.log(result))
.catch(error=> console.log(error));
Step 10:- Testing
Open Terminal and enter "node app.js" and click enter. Now open your Gmail and check your inbox for a received email from your web application.
For creating a "Forgot Password" mail
You can edit the HTML of "mailOptions" in the code to provide a link for a page where you will change the user's password and save it in the database.
If you encounter any problems or have questions, ask me in the comment section. If you like this post, then make sure to follow my blog. Thanks for reading.

%20(1).png)
Comments
Post a Comment